Flinks gives you the power to build the future of finance. Connect, enrich and utilize financial data to delight your customers with amazing products.
4 Tips to maximize value using Flinks’ Client Dashboard
We here at Flinks are very proud of the ease-of-use of our products and helping businesses understand and utilize financial data. This past March, we launched a new Client Dashboard, an all-in-one aggregation and analytics platform for financial service providers of all kinds.
Since then, we’ve been addressing customer feedback and improving our dashboard performance so clients can make more informed decisions faster. This time, we’re thrilled to introduce the filter & assign feature that enables your agents to take action on client requests as efficiently as possible.
To learn more about how to make the pre-built dashboard work for you to improve efficiency when assessing requests, here are four insights to get the best out of it.
Quick links
- Filter requests: save time when browsing your client requests
- Assign requests: encourage better team collaboration
- Invite borrowers: create an engaging customer onboarding
- Configure Flinks Connect: deliver a converting branded experience
1. Filter requests:
Save time when browsing your client requests
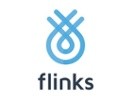
Managing a fast-growing customer pool can be challenging as your dashboard can be heavily loaded with hundreds of new client requests weekly. A clean and organized dashboard feed can play a critical role in end-user productivity.
Flinks has made it intuitive for your agents to manage their request feed with a set of quick filters designed to maximize search efficiency and uplift your dashboard performance.
Dashboard users can now filter and search the entire request library. Use single or multiple filters to remove clutter from the dashboard by displaying only relevant requests for the selected criteria.
How to make your dashboard look clean
- Filter “Activity” by:
- Assigned or not (assigned vs. unassigned)
- Assigned to whom (assigned to yourself vs. assigned to others)
- Review action (review completed vs. need review)
- Filter “Request Status” by:
- In-progress
- Complete
- Partially complete
- Errors
- Filter “Financial Institution” by:
- Institution type (Banking vs. Investments)
- Institution name
- Filter “Time/Date” by setting a date range
2. Assign requests:
Encourage better team collaboration
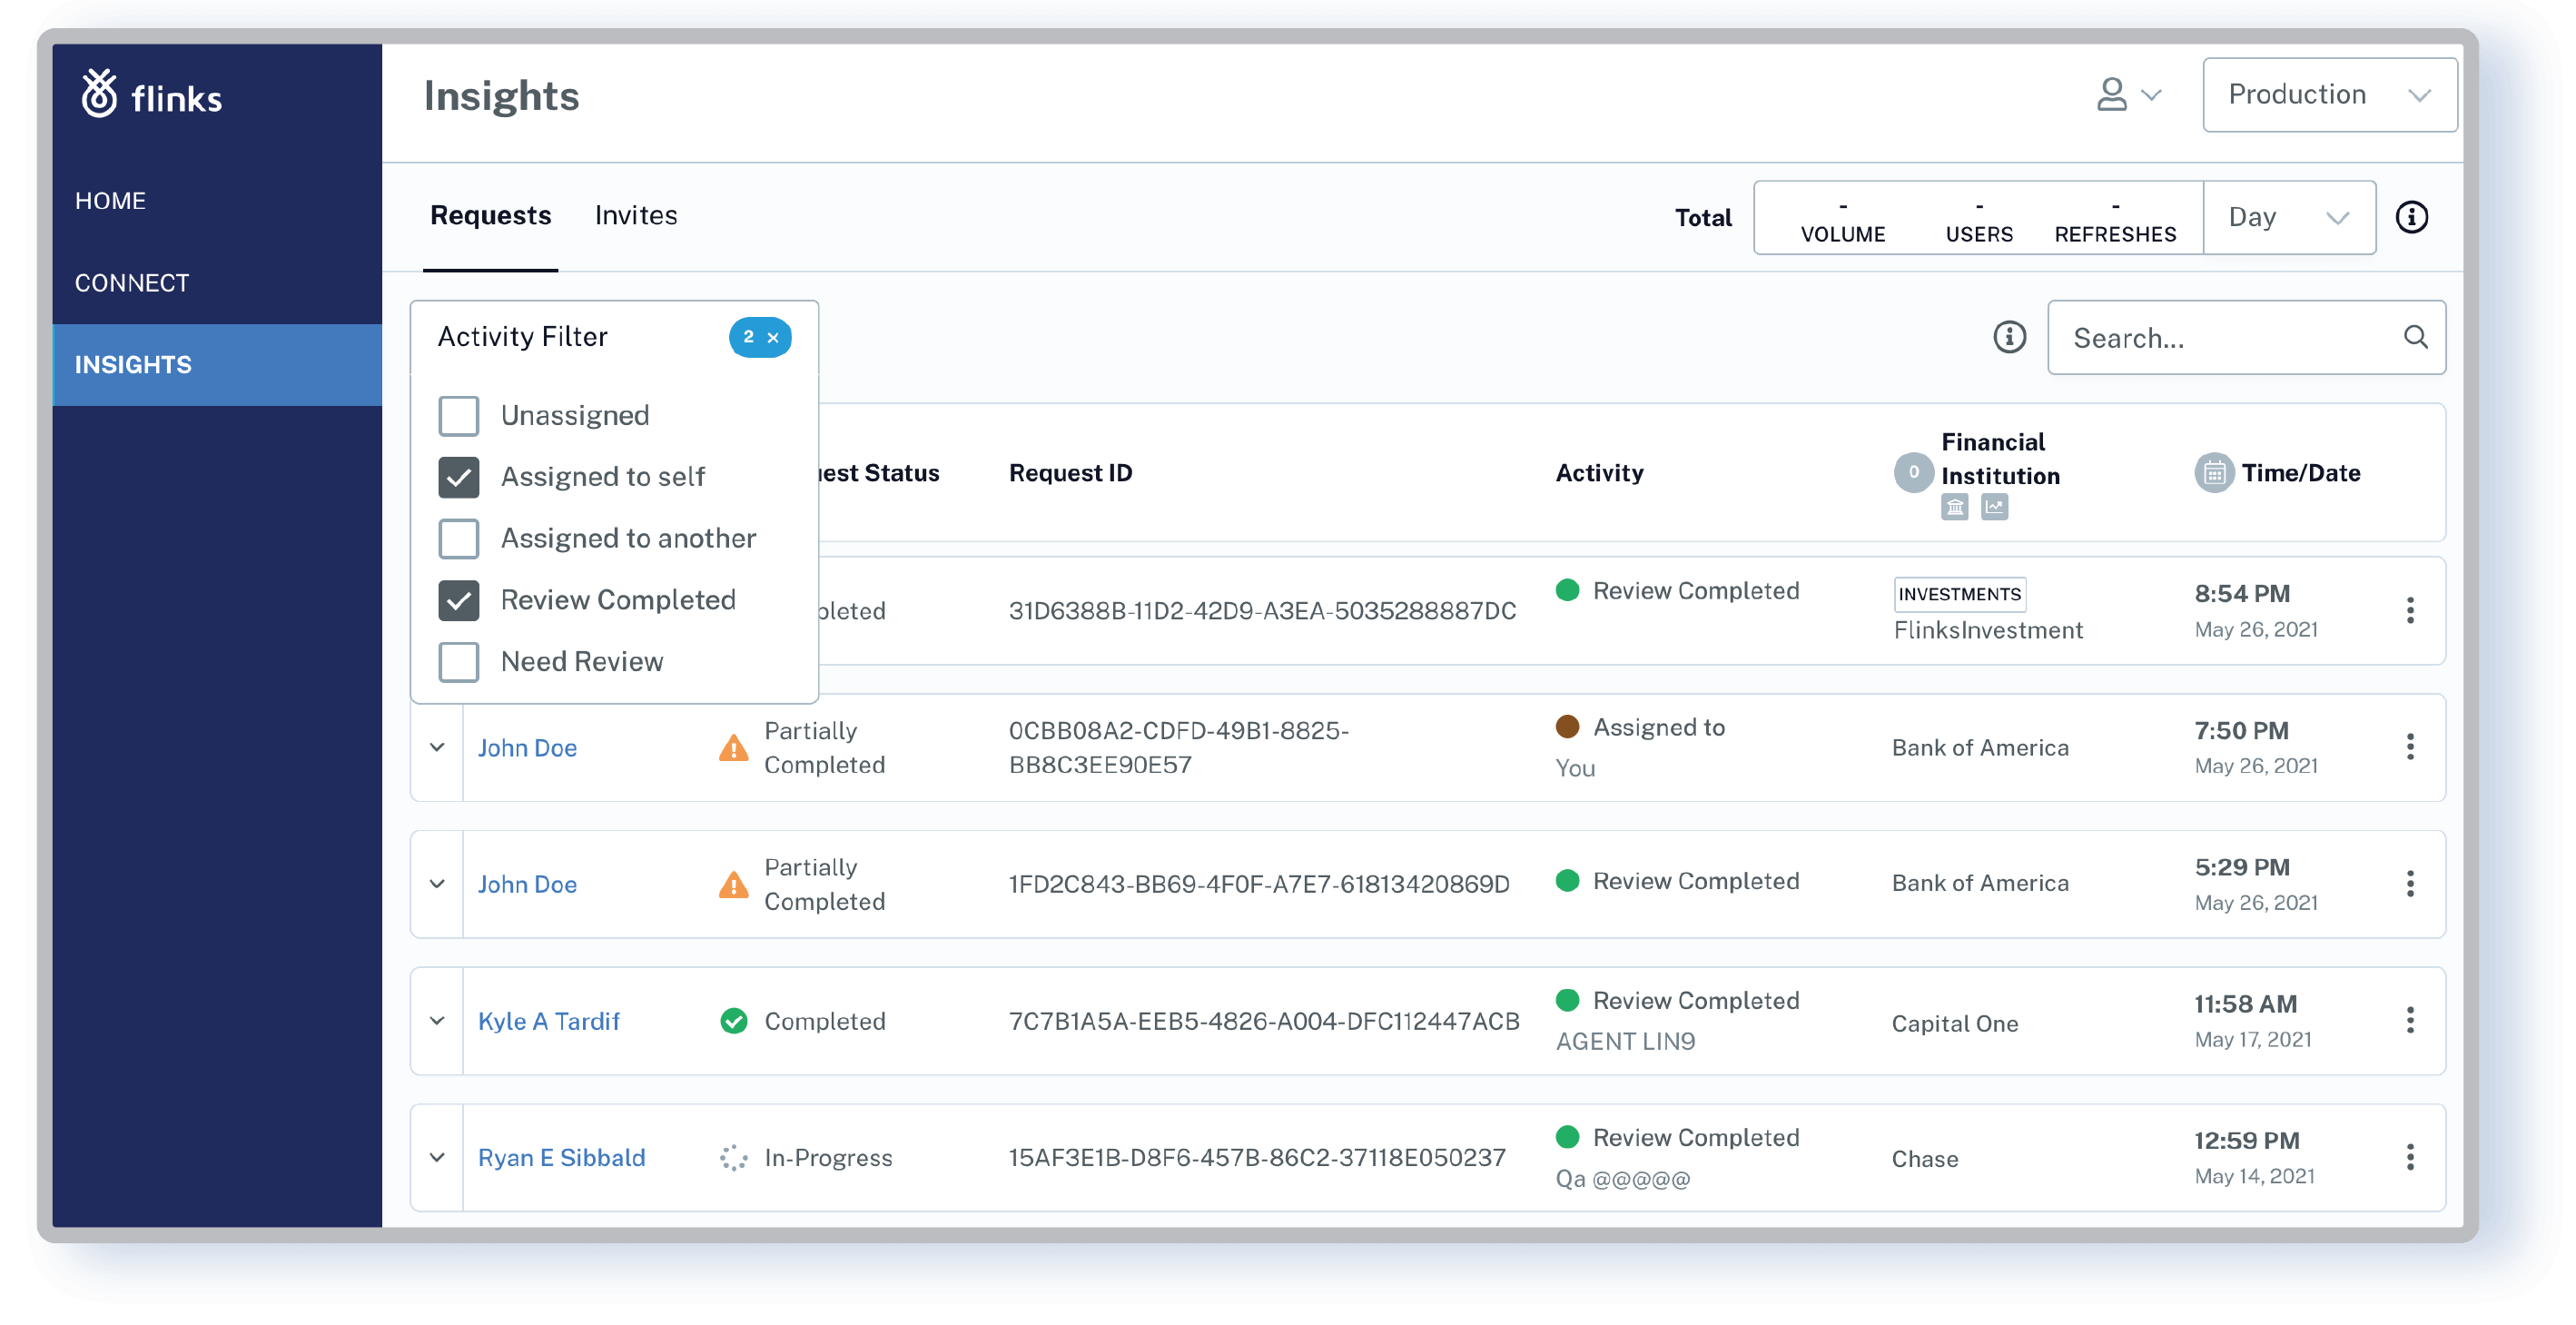
Dealing with client requests using disjointed tools and siloed systems can hinder your business growth. Flinks’ assign request feature allows you to assign review tasks to specific individuals, promoting better visibility and collaboration among team members. It is one of the simplest ways to sort, visualize, and manage your workflow by processing stage and/or by the assigned agent.
The added transparency can hold your team collectively accountable for progress toward end goals. Using Flinks as a centralized, collaborative workplace empowers administrators, request owners, and outside agents to manage client requests efficiently, from processing to closing.
How to enable agents to act proactively on client requests
- Use the “Take Action” drill down in the “Overview” tab:
- Self-Assign: assign the request to yourself and let others focus on unassigned clients
- Complete Review: close the request as no more action is required
- Needs Review: set the request as review needed
- Reopen Request: unassign the request for further action
- Use the ellipsis menu in your request feed:
- Self-Assign
- Unassign
- Reopen Request
3. Invite customers:
Create an engaging onboarding experience
Customers, officers, advisors, and underwriters often work across different channels, especially when businesses have both digital and brick-and-mortar operations. To convert customers more effectively, financial services need to create an engaging omnichannel experience. And onboarding is the first step.
A core feature of Flinks’ Client Dashboard involves invitations sent to customers to keep them informed and actively participating in the financial service they’ve opted-in. Even less tech-savvy customers can easily authenticate their bank accounts via a customizable email or an SMS without friction.
Leveraging the full potential of the customer invitation link of your dashboard can also reduce user drop-offs and make more of your clients successful down the path.
How to manage customer invitations effectively
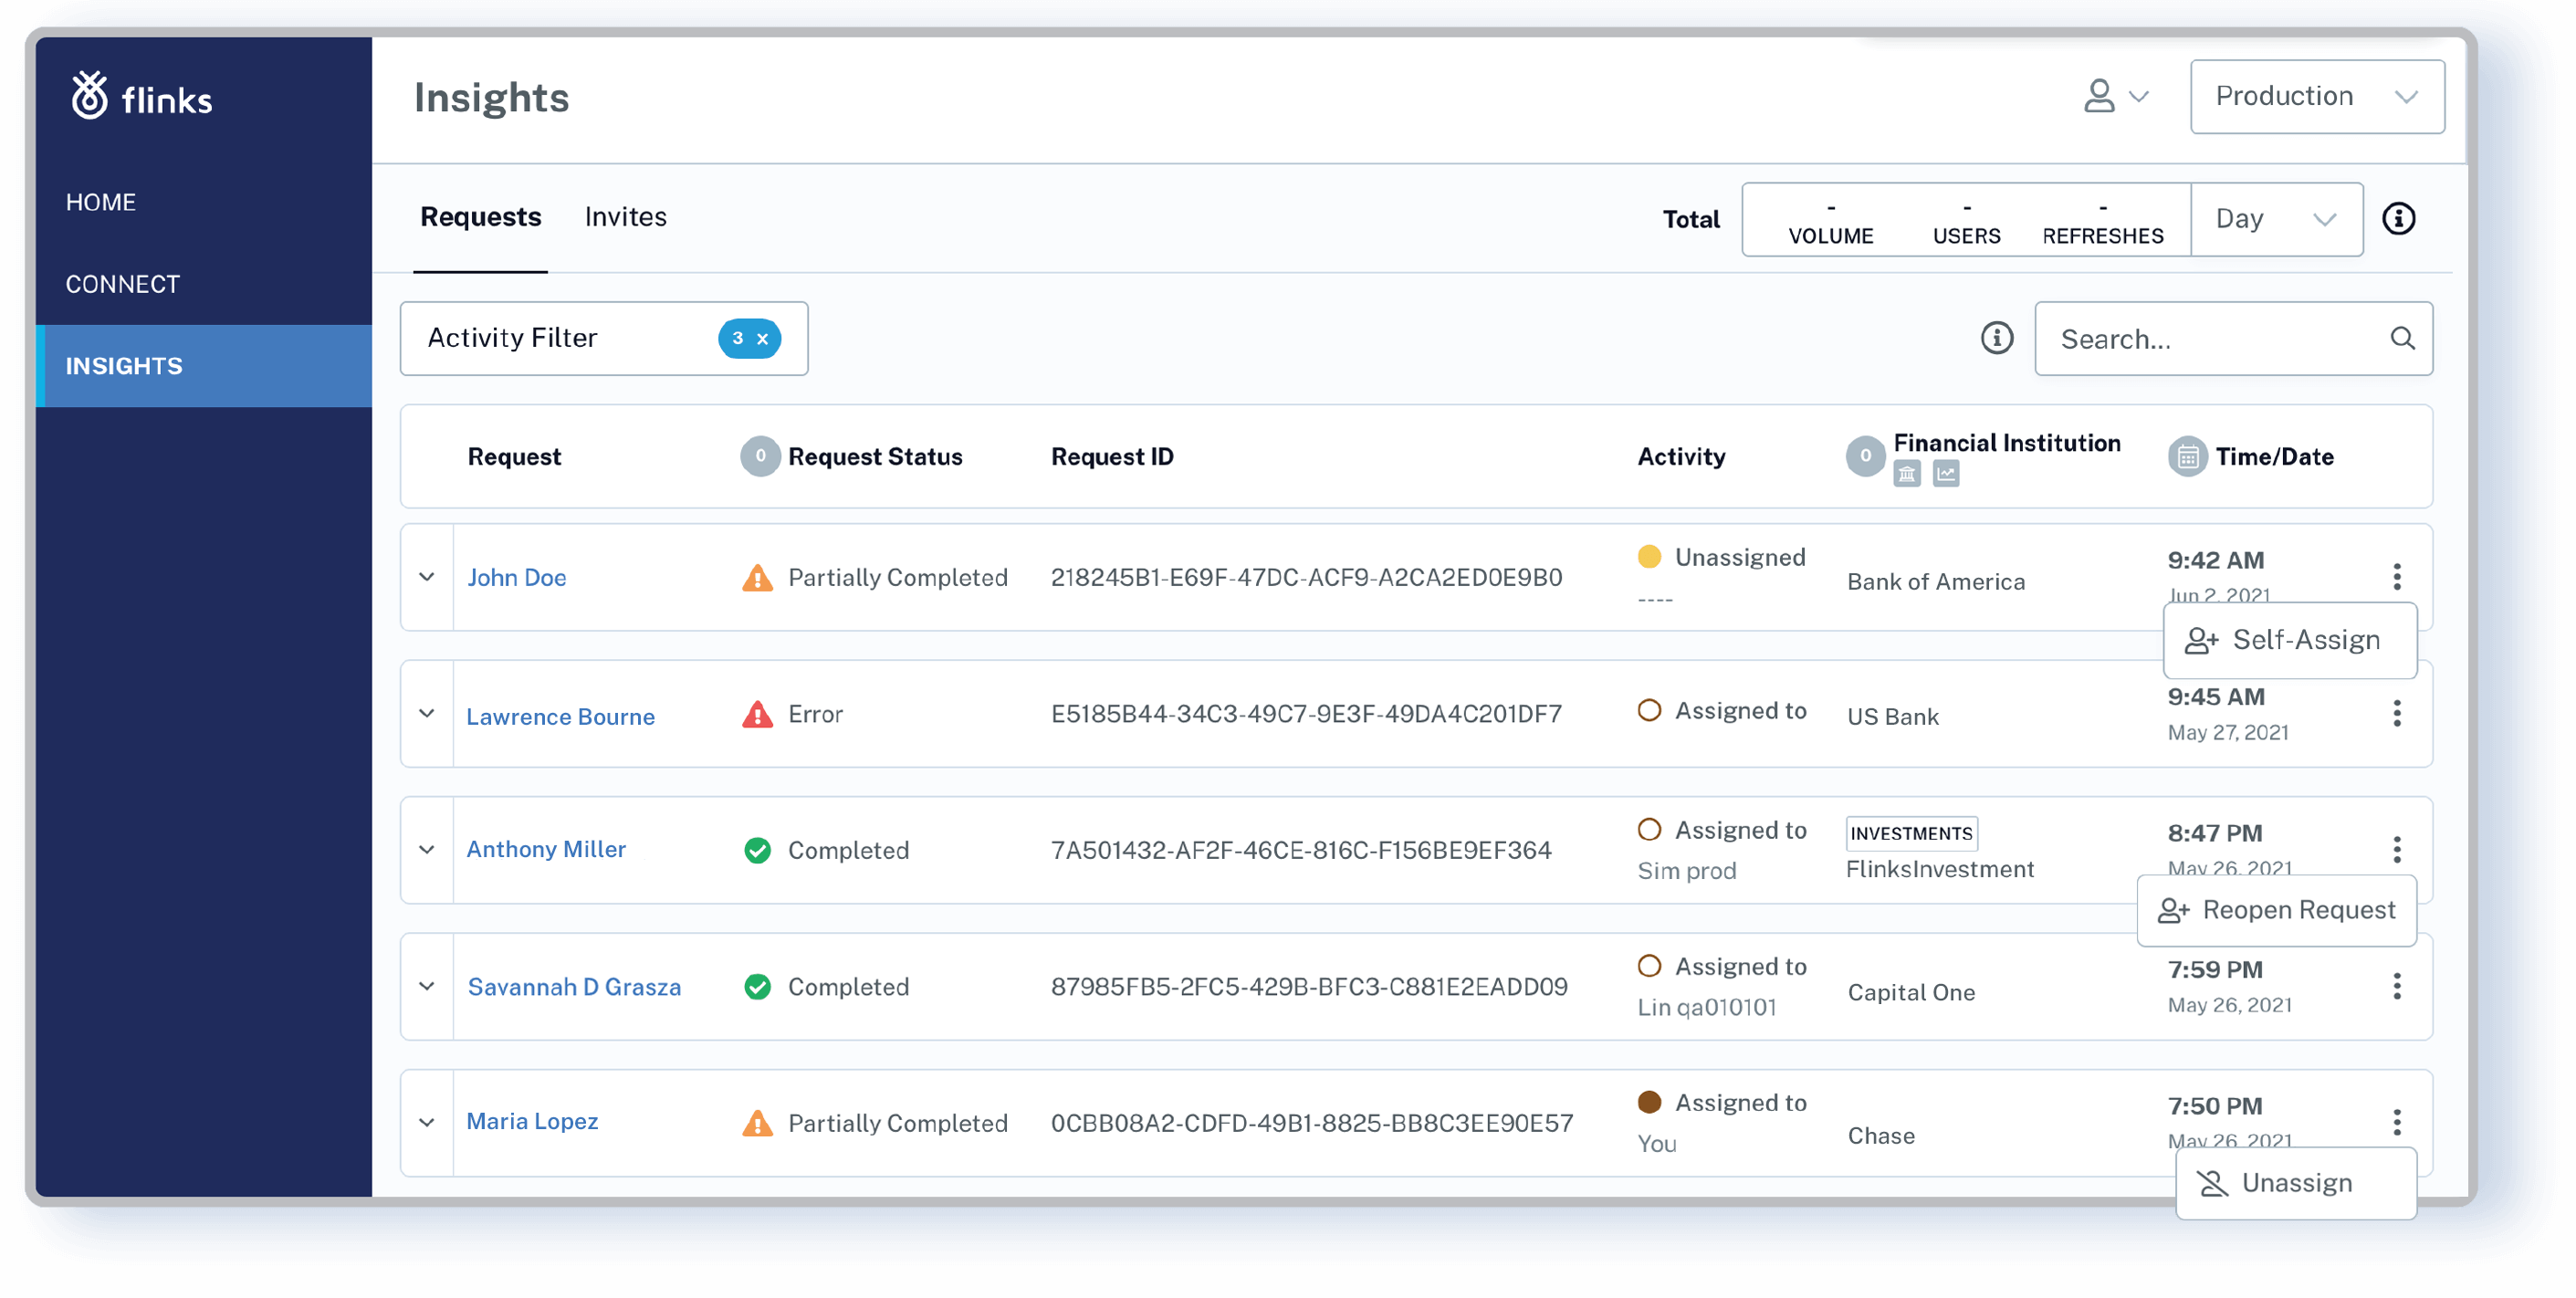
- Use the “Send new invite” feature to add new customers to your dashboard:
- By email
- Or by text
- With loan ID (optional)
- Use the “Invites” tab to track invitations hand-in-hand with your CRM/LOM:
- See customer name, email/phone, and loan ID
- Check invitation status: sent, completed, autherror
- Take action: edit/resend an invitation, view reports (for completed invitations only)
4. Configure Flinks Connect:
Deliver a converting branded experience
67% of customers claim that a bad experience is a primary reason for churning. Crafting a superior branded experience is more than just adding your logo — it’s about delivering an end-to-end experience embodied in every customer interaction. And Flinks offers an industry-leading white-label iframe – Flinks Connect – to brand your entire customer experience.
Dashboard users can adapt the customer authentication experience to your brand (logos and colors) and your workflow (custom banner, texts, and optional forms) using Flinks Connect Configurator. No UI/UX design or implementation resources are needed on your end.
Keep in mind that your dashboard can do more than access end-user banking data and analytics reports. Flinks can help simplify your onboarding with a clean, sharp, and intuitive UI; leverage your dashboard to build meaningful engagement and create brand loyalty.
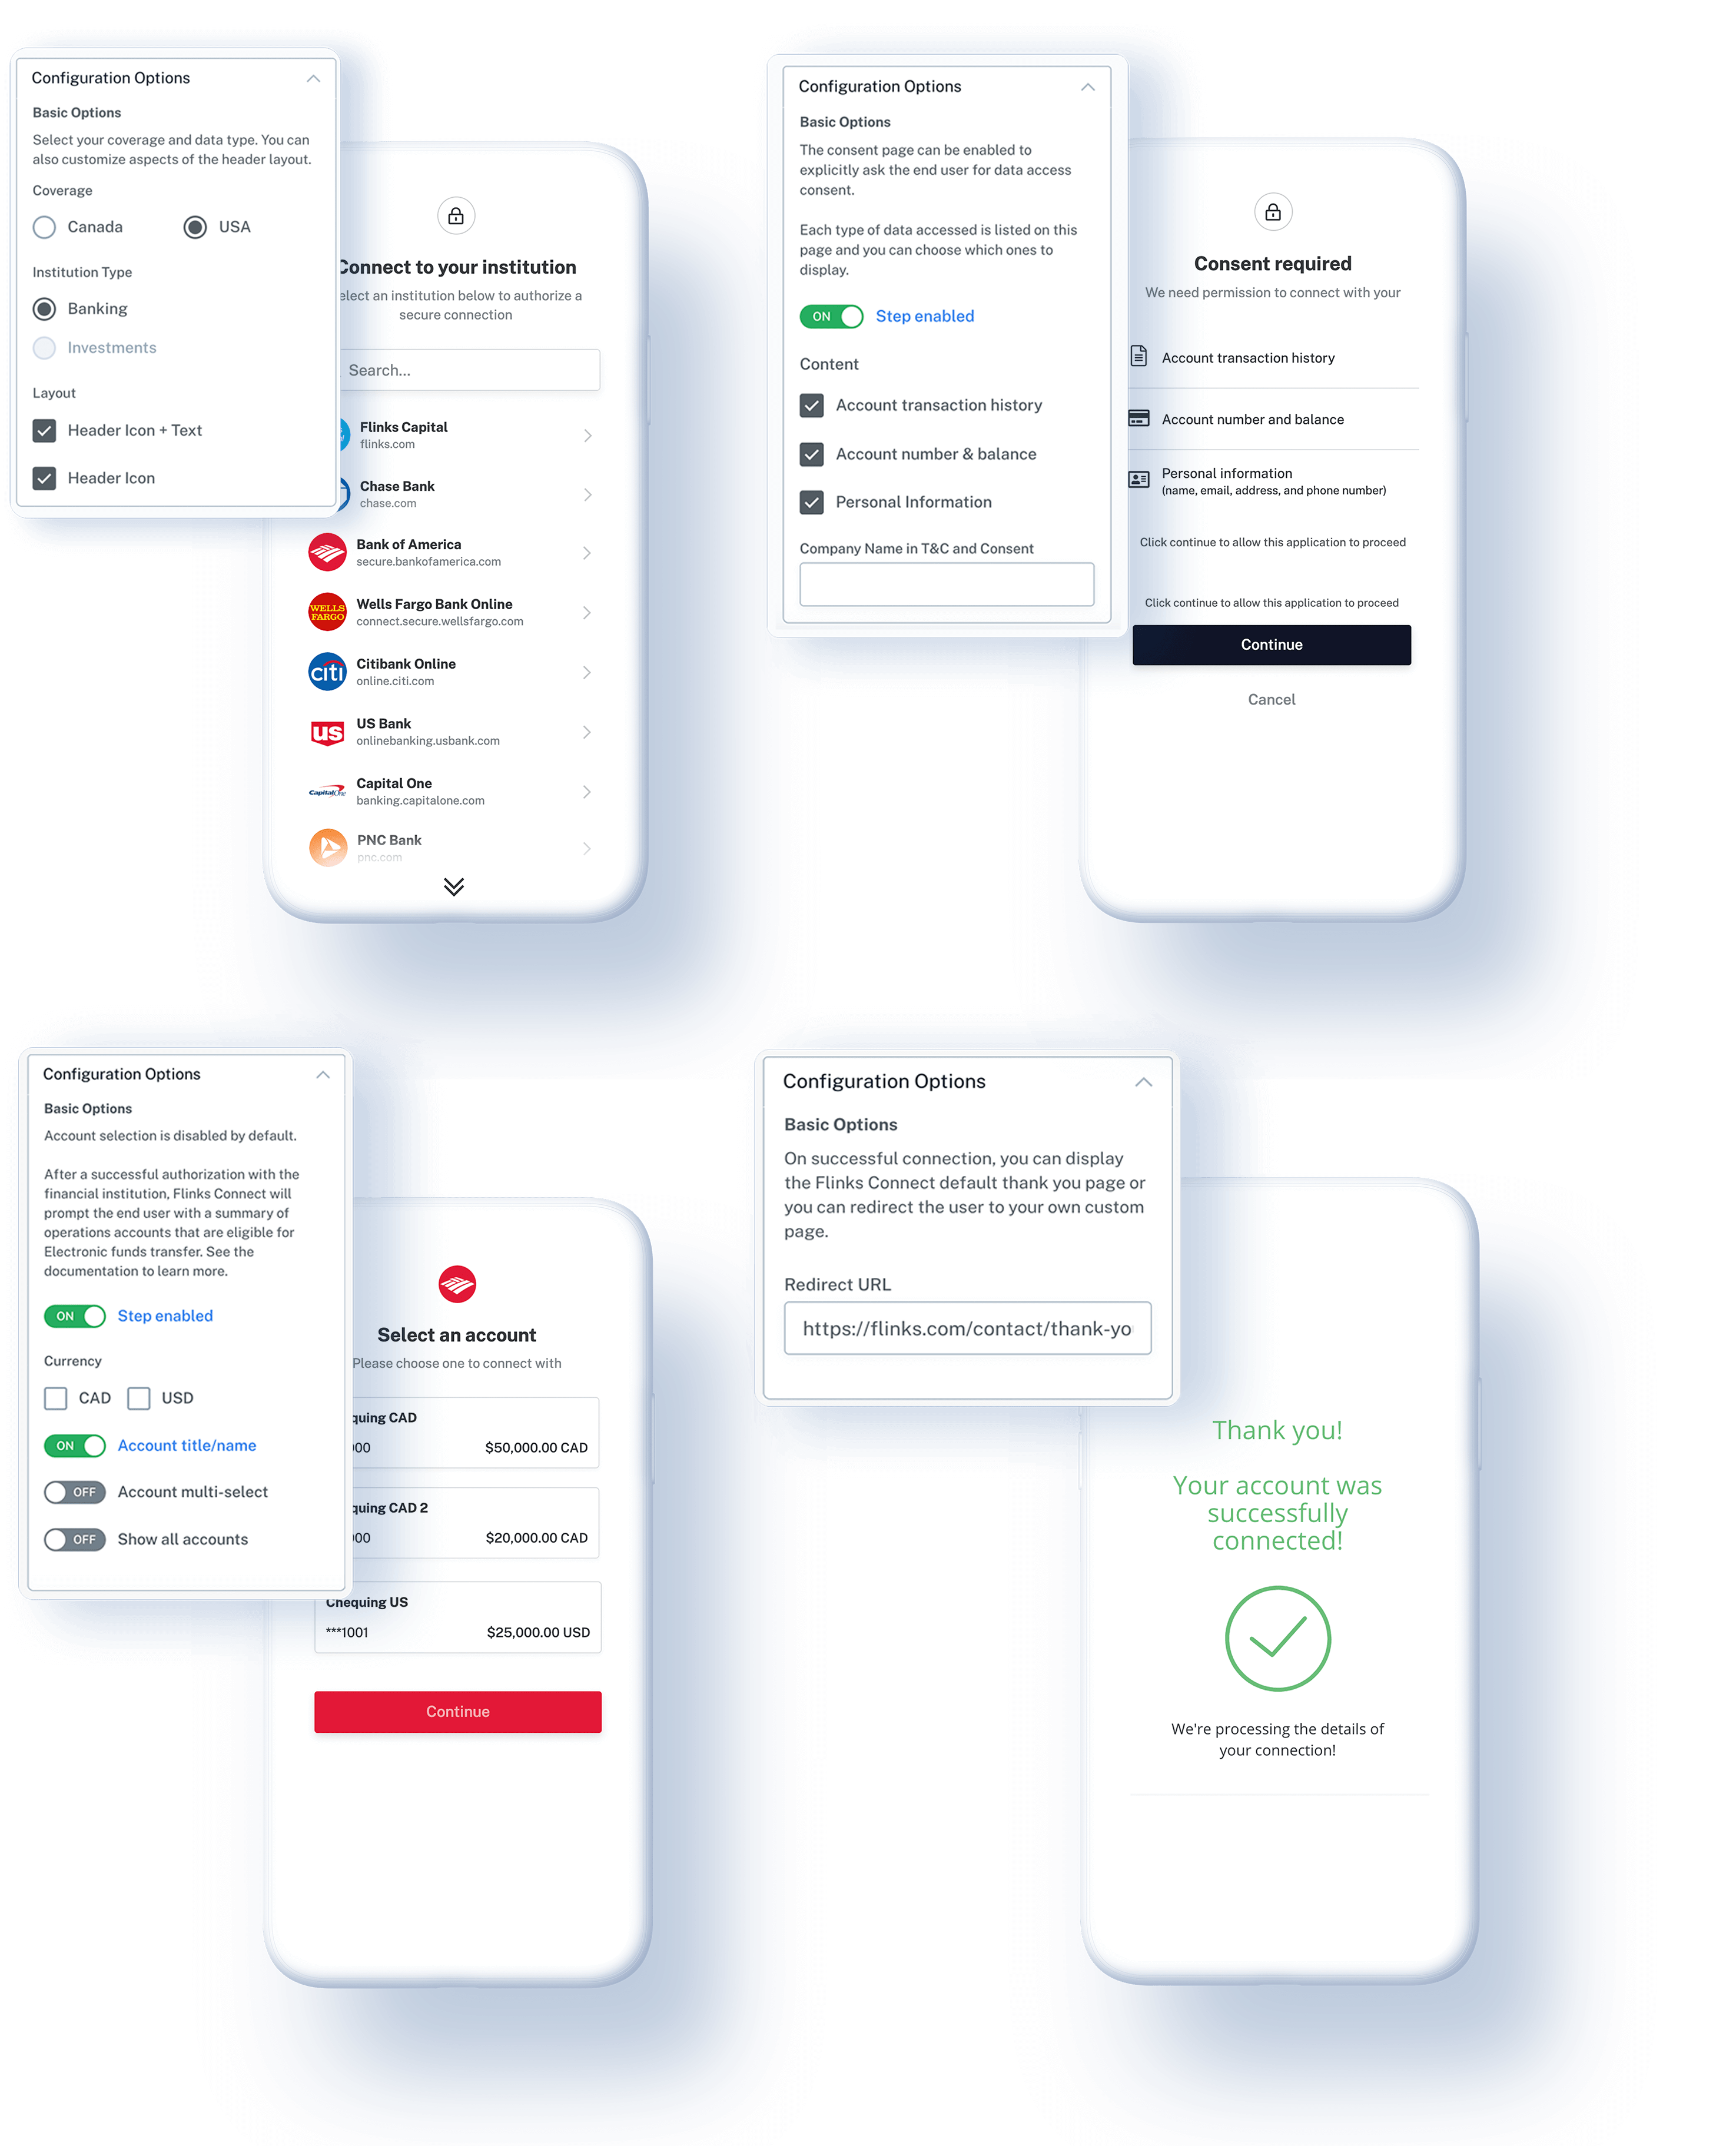
How to optimize & integrate your brand within Flinks Connect UI
- Use the “Configuration Options” drill down to select:
- Coverage: USA/Canada
- Institution Type: Banking/Investments
- Layout: Header Icon/Header Icon + Text
- Use arrows to preview the end-user authentication process:
- Institution Selection
- Consent
- Account Authentication
- Account Validation
- Account Selection
- Account Connection
- Use toggle toolbar to preview your UI on different devices
- Use the “Generate Code” button to get the code snippets for your app/page
Reap the benefits of your dashboard
If you haven’t started using Flinks’ Client Dashboard, you’re only one step away from the best-in-class turnkey solution for your financial products and services. Contact us to help you set up your private instance today and get your dashboard running.
If you’re a current user and interested in learning what you can do with your dashboard, keep a close eye on it as we are continuously adding new features and making improvements. We aim to provide users with a centralized platform to have your customers, analysts, officers, and underwriters work together.
As always, feel free to get in touch with us if you have any questions regarding Flinks’ Client Dashboard or anything product-related. We’d be happy to help.

You might also like

Every Company Can Be A Financial Data Company: Introducing Flinks’ New Dashboard
Flinks’ new Client Dashboard is your one-stop shop to access customers’ financial data, visualize insights, and deliver personalized customer experiences.

How Flinks Helps Merchant Growth Deliver Convenience in SMB Lending
Find out how SMB lender Merchant Growth uses Flinks to expedite onboarding, assess risk, and deliver funds in just 24 hours.